Loosing weight takes discipline and consistency. In order to stay fit, you need to work on your self and eat healthy foods, cut down on your daily food portion size. Here are some yoga positions that will help you stay fit.
1. Board position
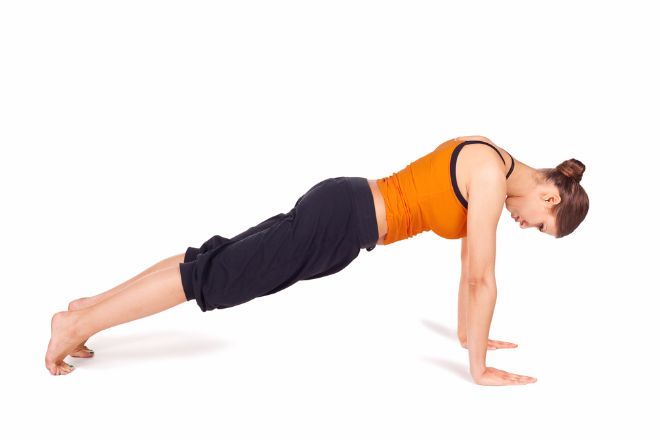
The board pose proves to be nearly a full body workout. This move focuses on the thighs, buttocks, shoulders, back, and the stubborn belly area.
The board pose proves to be nearly a full body workout. This move focuses on the thighs, buttocks, shoulders, back, and the stubborn belly area.
How to do it:
Step 1: Start in a pose similar to a push-up with your arms extended under your knees and hands positioned under your shoulders and arms.
Step 2: Breathe in as you gaze ahead of your hands. Take care to keep your back and spine straight.
Step 3: Keep your hands flat and your fingers spread as you pull in your abdominal muscles.
Step 4: Remain in this position for 15-30 seconds before releasing to your knees.
Step 5: Repeat this pose 5 times with a 15-second break in between.
2. Wind Easing Position
The wind easing position is a great pose for soothing lower back pain, strengthening your core, hips, and thighs. It has even been used to promote healthy pH levels and increase metabolism.
The wind easing position is a great pose for soothing lower back pain, strengthening your core, hips, and thighs. It has even been used to promote healthy pH levels and increase metabolism.

How to do it:
Step 1: Lie on your back with your legs stretched out with your heels touching each other and your arms at your side.
Step 2: Breathe out as you bend your knees as you move them toward your chest.
Step 3: Hold your knees as you pull them closer into your body
Step 4: Tighten your thighs and apply pressure to your abdominal muscles as you hold the position.
Step 5: Hold the position for 60-90 seconds as you breathe deliberately and deeply.
Step 6: Breathe out and release the knees as you allow your arms to rest on your side.
Step 7: Repeat 5 times with a 15-second break between each pose.
3. Pontoon Position
The pontoon pose focuses on the back and leg muscles which ultimately helps reduce stored fat in the waist.
The pontoon pose focuses on the back and leg muscles which ultimately helps reduce stored fat in the waist.

How to do it:
Step 1: Start in a lying position on your back with your legs stretched out and your arms down at your side.
Step 2: Inhale as you lift your legs up while stretching your toes and feet. Your legs should remain straight.
Step 3: Form a 45-degree angle with your body by reaching your arms toward your extended legs.
Step 4: Breath normally as you hold the post for 15 seconds.
Step 5: Release the pose and allow your body to rest for 15 seconds.
Step 6: Repeat the pose 5 times with a rest in between each on
4. Bow Position
The bow posture is ideal for strengthening the core and tightening abdominal muscles. It offers a full body stretch that increases energy and promotes easy digestion.

How to do it:
Step 1: Lie stomach down on the mat with your legs stretched out and your arms to your side.
Step 2: Bend the knees upward while reaching your arms back to hold your ankles or feet.
Step 3: Hold the position 15-30 seconds while breathing normally
Step 4: Exhale and return to the lying position allowing your body to rest for 15 seconds.
Step 5: Repeat 5 times with rest time in between each pose
5. Cobra Position
The cobra pose strengthens the spine and upper body -- it proves to be a multi-muscle workout. This pose is not recommended for people who suffer from a hernia or back injury or women who are pregnant.
The cobra pose strengthens the spine and upper body -- it proves to be a multi-muscle workout. This pose is not recommended for people who suffer from a hernia or back injury or women who are pregnant.

How to do it:
Step 1: Start by lying stomach down on the mat.
Step 2: Stretch your legs away from your body as you pull your arms in under your shoulders
Step 3: Allow your toes and chin to touch the floor.
Step 4: Breathe in deep and slow as you thrust your body chest upward.
Step 5: Hold the pose for 15-30 seconds and slowly exhale.
Step 6: Rest for 15 seconds.
Step 7: Repeat 5 times with a break in between each pose.
6. Boat position
Similar to the bow pose, the boat pose offers a workout for the belly, back, arms, and legs.
Similar to the bow pose, the boat pose offers a workout for the belly, back, arms, and legs.

How to do it:
Step 1: Start by lying on your back with your legs stretched and your arms at your side
Step 2: Breathe in deeply as you lift your chest upward and raise your feet off the floor.
Step 3: Keep your gaze forward to encourage alignment in your body.
Step 4: Hold this pose as you inhale and exhale 10 times.
Step 5: Repeat this pose 5 times with 15 seconds of rest in between.
7. Chair position
The chair pose is a focused pose that strengthens the spine, pulls in the abs, and supports the hips and thighs. An article on The Health Site warns that you should not do this pose if you have a back or knee injury and should be avoided if you suffer from chronic headaches or insomnia.
The chair pose is a focused pose that strengthens the spine, pulls in the abs, and supports the hips and thighs. An article on The Health Site warns that you should not do this pose if you have a back or knee injury and should be avoided if you suffer from chronic headaches or insomnia.

How to do it:
Step 1: Stand up straight with your hands in the Namaste position in front of you
Step 2: Bend your knees as if you were sitting in a chair
Step 3: Raise your hands above your head.
Step 4: Bend your torso inward as you go deeper into the position
Step 5: Breathe normally as you hold the position for as long as you can.
No comments:
Post a Comment